I won't go into it in great detail. If you need more info, look here:
This is fairly important background stuff; don't skip it.
Before we get cracking on our main bit, I must point out that there are two
main versions of Lazarus, v1.1 and v1.2.
This walkthrough was originally written for v1.1 over a course of four months,
and to my horror, when v1.2 was released in April 2006, I found that it fixed or
removed a lot of the best bits. Therefore, I have constructed a
1.1 emulation patch known as 'Gamma Project' that re-enables some of my
favourite bugs.
Installing the patch is just a matter of unzipping it and copying it into your Lazarus
resources directory, so it's easy and temporary. When you want to play 'straight' 1.2 again,
just remove the file and it will go back to normal.
Naturally, the Lazarus team will not support you if you're using my mod, and I don't know what it does if you install it on 1.1!
The 2020 update (Gamma Project r1.1) includes the source code (as it should have originally) and also allows you to get the spellbook off Flain in Skara Brae.
If you're still using V1.1, make sure you have the 'Anti-Blink-Blindness' patch which makes the Blink spell more reliable.
For convenience it can be obtained here: lazarus_blink_patch.zip - this is for 1.1 only!- As with Gamma Project,
unzip it and copy it into your Lazarus/Resources directory.
First off, the Avatar is a junkie. He's addicted to two main substances, 'Food' and potions.
Food is probably the most dangerous, since the Avatar is totally unable to kick the habit
and withdrawal will kill him. Worse yet, the other party members will find themselves getting
sucked into the habit too and will also become Food users simply by virtue of being
in close proximity to the Avatar.
However, it is worth noting that since they weren't heavy users before joining the party,
they can recover quite rapidly and if asked to leave, will (after a brief period of
rehabilitation) lose their dependency on Food. Also note that in Ultima 6 the avatar has
largely managed to kick, and is only an occasional user. By Ultima 7 the entire party is back on
the stuff full-time.
As noted, cold turkey is not an option. If the party runs out of Food, they will go into
withdrawal. This is extremely unpleasant, as the party members will all scream
"I'm starving!!!" and begin to bleed profusely, leading to death within about 15 minutes.
The only way to avoid this is to obtain more Food, and quickly.
This usually presents a problem; the chances are the party will go into withdrawal in the
middle of the night, or some other time when the shops aren't open. The Avatar will often
be forced to steal bread or similar substances in order to stay alive. This is not good
for your karma.
In theory, each town should have at least one Food pusher. However, the Oppression has
been extremely good at cracking down on vice, and consequently Food is difficult to obtain.
In Britain there are three sources, but only one of these is reliable.
There are two inns and a provisioner. The provisioner ostensibly makes a living selling
various agricultural implements, but this is in fact just a front for his drug operation.
He sells a highly concentrated form of Food, known on the street as 'trail rations'.
The provisioner is happy to sell you his wares unless you are unfortunate enough to try
and buy from him while his friend is visiting the shop. The presence of a Shadowlord will also prevent the transaction from going through, and in 1.1 he will refuse to sell you anything at all in the afternoon - the Dealer, as Burroughs points out, is never on time.
The first inn is the Wayfarer in central Britannia. It is also home to a man known as The Cook.
Do not attempt to buy Food from him; for three gold coins he will offer to sell you some Food,
but in actual fact takes the money and scarpers. Speak instead to Tika, who is pretty
reliable. She will also fence other goods for you.
The other dealer is Andre at the Blue Boar. For a Food dealer there is a marked lack of Stuff.
If you speak to him he will offer you a hard drug cocktail known as 'Chicken in a Casket'
which unfortunately is intended to be taken intrevenously and will not actually satisfy
your cravings. He won't sell you any proper Food at all, and although there are three
loaves of bread on the counter, he refuses to sell them at any price. Stealing them is not
recommended as he will defend his stash with lethal force.
Since there is no prior warning before the party slip into the lethal Cold Turkey state,
be sure to regularly monitor the amount of Food the party has in its stash.
I try to avoid slipping below 100 hits of Food.
Food is not the only drug that the party needs. There are a variety of other substances
which they will need a hit of from time to time. These are considered 'Soft' drugs and
while not strictly legal are in fairly common usage throughout the population. The most
common of these is the Yellow Potion. The only known dealer in potions is a young man
who lives at the Healer's shop in East Brittany. His shop seems to open around 10pm.
Your first task is to obtain sufficient money to buy a large stash of Food and drugs.
This is not optional.. it is the bare minimum needed to keep the party alive.
If, as is likely, you are skint, you'll have to resort to thievery. This will have
a negative effect on your karma, though, and karma is pretty important in this game,
not least because if you're anything less than perfect your entire party will lose
experience points each time the avatar dies.
If you can't afford to keep up the party's Potion habit, you can usually heal
the party by making them sleep for around 8 hours. This is enough to fully heal everyone,
at least in the early days of the quest. In theory you can only sleep in the
wilderness, but in practice the game is far more lenient. It all hinges on
whether there is anyone else around.. if not, pretty much anything goes
although the game does seem to have inhibitions against lighting fires upstairs.
Downstairs is usually okay, as long as there aren't any witnesses. In addition
the owners don't seem to object to coming home to find six strangers lying
fast asleep around a campfire in the middle of their living room.
The guild hall in Britain is another good one.. just wait for everyone to leave
and then set light to the carpet.
When they awake, each member of the party will twitch and quiver like an
animal that's just been shot. Why is unclear.
Finally, it is possible to light campfires in the sea, or even the sewer;
in both cases the party will sit down in the water and go to sleep, rising
up from the murky depths in the morning like zombies. That breathing is
unnecessary for the party to survive may be a beneficial side-effect of Food.
If healing is unnecessary and you just want to pass time, you can press ';'
to set game running 10x faster, and wait for the dawn like Christopher Walken
in The Prophecy. This same dialogue also shows your current karma level,
which is handy.
Note that sleeping will sometimes cause the party to freak out and have
this strange trip where the dead king turns up and either makes barbed
comments on their performance or blesses them and makes them feel well 'ard. This also happens
when you die.
Interestingly the party only rarely seems to have the trip in their sleep when
their karma is zero, in fact it only seems to happen when one of the party
is ready to level up. I guess the idea of the King turning up out of nowhere
and calling them all worthless shits for no reason is just too far out.
In v1.1, the blink spell is very, very buggy. With 1.1 and the blink patch
it becomes more usable but is still dangerous.
Usually if it goes wrong it crashes the game outright, but there is one
phenomenon which you must be aware of - 'Blink Madness'.
When this happens, one of the party members will believe they are somewhere
else. In my case it was usually New Magincia. Their body was with the rest
of the party, but if you selected them, you would see a fractured version
of New Magincia instead.
This has two other side-effects while the game is in this state: the game
crashes when you try to save, and it greatly increases the chance of the
game freezing up while you're innocently walking around.
So each time you cast Blink (or use the grapple), check each of your party
members in turn to make sure they haven't gone mad.
So, what do you do if one of them has succumbed to the madness? It's quite
easy, but very messy. You need to reboot them. This is achieved by the following means:
..as you can guess, this does not do your karma any favours, but it is the only known way to
recover the game from that situation. You can buy IMC scrolls from the Lycaeum..
several free ones are listed throughout the walkthrough. Keep your stocks up.
In 1.2, the Blink spell is far better behaved and you probably won't need to do this.
Anyway, I think that's enough hints and background. Now it's time for the walkthrough.
Lazarus Unbound
(Six-score-and-ten Oblations to a Malefic Avatar)
The Quest Begins
Names are important. Call your character one the following:
- Daniel Ti'Fiona (it has mythic resonance)
- Godfather Smurf
- Doctor Ink
- Keyser Soze
- O True King
- Jubelo, Jubela or Jubelum (three brothers who sought to learn the Masons' Word of power)
IDM: Hmm, humility or spirituality?
     We'll join the worthy spiritual order, 'cause then we'll get powers!

JPM: You know, I always seem to end up serving justice.  It's what you end
     up with if you go 'round slaying people and taking their gold.
Okay. So the first thing is to get as rich as possible so that you can
buy enough Food to keep the party from experiencing terminal withdrawal.
One strategy is to make your party 'ard as nails, since the 'arder they
are, the better they will be at killing things and stealing their valuables.
A possible approach to gaining experience points and loot is to pick an
otherwise useless town or two, such as Skara-Brae or Paws, and act
out the Immigrant Song by Led Zeppelin. You will have to spend a
enormous amount of money later on to buy back the karma it will cost you,
but it can't go lower than zero anyway. Just don't let any of the party
members die until you're back to at least 75%. But more on this later.

"Valhalla, I am coming..."
As a side-effect, and especially in 1.1, you may find it increases the
realism of the game in that you are now truly outlaws, and the
entire population of the game will attempt to kill you on sight. This
can be inconvenient, just make sure that you've set the party to
'HOLD FIRE' each time you approach civilisation. You should still be
able to talk to people, just keep out of their way because they'll try
their damndest to kill you.
This can also have the unfortunate side-effect of making the party become
psychotic and completely dysfunctional. This has the following symptoms:
- The party members all hate each other and frequently try to kill each other during combat
- Casting Heal on the Avatar during combat causes his followers to turn around and shoot him dead
- The party refuses to sleep, saying it's "not safe".
They're probably right - the Avatar would likely wake up to find just one
single, bloodstained party member and a heap of corpses. Assuming he wakes up at all.
You might find this effect to be fun.. on the other hand, it's probably a little
too early in the game for this to be viable, so I'd load back if I were you.
Hands up: gimme the grapple
Having stopped off at Britannia to get Food and ideally a warhammer from the Provisioner, make your way to Empath Abbey and rope Julia into the party.
Be very careful if you arrive before dawn.. under some circumstances a guard
will arrive at breakfast and kill Julia along with many men.. this gives
you a very narrow window of opportunity to get her to join the party.
I suggest you give Julia full plate armour when practical, to turn her into Julia of Arc,
and give her a scythe as her weapon. Once we get her onto the magical shit you can
still keep this as a 'decorative' weapon because it looks very menacing.
While you're hiring, pick up Toshi as well, it will make the next bit easier.
If you haven't already done so, find Lord Michael and get the grapple from him. This is very quick and easy to do:
First, you take a very large hammer.
Next, you keep hitting Lord Michael with it until the grapple falls out.
Finally, you grab it and run like hell before the lynch mob catches you.
Having recruited Toshi as an extra to assist in the mugging, he has now served his
purpose. Strip him of all his belongings (the protection ring in particular) and kick him out of the party. Do not
kill him (or he'll simply turn up on your doorstep the next time you die).
Arming the party with kick-ass weapons
What good is a glass dagger?
Now go to Serpent's pass with the Grapple (or Blink spell, if you're Level 3).
Go up onto the beautiful snowy bits until you find a large hole in the
mountain forming a pit. At the bottom of the pit are approximately 11 glass
swords (one of which has the King's name on it). Using the grapple, go
down t' pit and gather up the goodies. We will need about six of these for
the walkthrough, so try to avoid using them unless you can replace them (there are a few more scattered around)
Bound with fearsome spells
Once you have the swords, go to Cove and find Sarkael the demon. Now
of late I've been taking a pro-demon stance, and I urge you to do the
same (particularly if you're playing Daniel Ti'Fiona.. he IS a demon).
Regrettably, we are going to top Sarkael, though. Nothing personal,
it's just that when he dies, he will drop his spellbook. Take him out
with one of the glass swords, and give the spellbook to Iolo. Remove
his original spellbook and use Sarkael's instead: it will give Iolo
super fireball powers, taking no mana whatsoever. This is extremely
useful.
Test it out by killing the trolls on the shore of the river.. they have
a pair of VPR scrolls, a halberd and various other useful/salable items.
Stock up on reagents for the Blink spell (Bloodmoss & Spidersilk) from
the guy in Cove, and take the IMC scroll from the healer as a precaution.
While you're in the area, meditate at the shrine, and then wander down to East Brittany to buy potions, plus
a bedroll from the provisioner in Central Britain, if you don't already have one.
Then make your way to Yew.
Dress code
Style is of paramount importance. Go into the Yew jail and find the torture
chamber. Lie in wait for your prey until The Inquisitor turns up, and smash her using
one of the glass swords (she has 300HP). Take her robe and give this to Iolo.
Remove all other armour from him, such as gloves and helmet. Give him swamp boots,
and to help counterbalance the loss of the other armour, a spiked gorget and
two protection rings as and when you can get these. The Inquisitor's ring and the one you nicked from Toshi should get you off to a good start.

For the last time, it's not a dress, it's a robe!
Gather up all the Inquisitor's other belongings and sell them at the next opportunity.
After I killed The Inquisitor, I went to the crooked provisioner's shop at night and
shut the door, waiting for her to arrive. During this time, the guards had evidently
discovered The Inquisitor's body, as one of them approached me and asked if I wanted
to come quietly. She wandered off again when I said 'no'.
Anyway, while you're at it, try and obtain a sledgehammer, or failing that the warhammer we used on Lord Michael.
Use this as Iolo's 'decorative' weapon, as a Christ-like figure wielding a f___-off big hammer is, um.. strikingly different.
Buying your Avatarhood
Anyway, after the violence and bloodshed at Yew you may find it necessary
to visit Minoc armed with up to 200 gold coins, if you can afford it.
At Minoc there lives a poor bugger from whom you can buy karma. I can't
rightly remember if it's 1gp or 2gp per point, but nonetheless it's a
bargain. You just need a little patience as it has to be done point by point.
Sadly, in 1.2 he will only sell you up to 15 points of karma. But we'll be able
to sort this out (at extortionate cost) once we get the Shrine of Sacrifice back online.
In fact, if you're using 1.2, I would hold off visiting the beggar of Minoc
until we need to do Despise later on.
When and if you have replenished your karma (and stash), make your way to the
desert. Heading directly east from Minoc is not recommended as there
is a 'dead spot' in 1.1 which will destroy the program, so you'll have
to skirt around it. Probably it would be best to make your way back
to Kafaristan Pass and then head east. This issue was fixed in 1.2, though.
If you are still Level 2, you'll need to fix that before we can proceed. You'll need
200 experience points on the Avatar. You should just be able to get this by mooching
around in the wilderness between Cove and Minoc. If Iolo is getting all the kills,
you could lend the fireball spell to the Avatar for a bit. When you've got enough
experience, you'll need to sleep until the dead king comes and has a little chat
with you.
Once you reach the desert, visit the shrine, talk to Sinner: Vra'al and
finally make your way to the southeastern edge where you can see the edge
of Dagger Isle. Using your Super Blink Powers, beam yourself onto the
island and visit the shrine here too.
Do not, I repeat, DO NOT break the shrine! You'll need it later for the
Lycaeum quest, and you can't resurrect it with IMC.
Anyway, once you're done, head south (without killing any wolves) and walk
towards the sea. When you reach the edge of the land, it's time for...
Ocean Travel Without Instrumentality
"Civilization without instrumentality? Impossible!"
-- Forbidden Planet
Stand on the edge of the shore. Cast blink and aim into the sea.
Lo, the party should be transferred to the deeps. As noted, they have
no need to breathe.
The party can now quite happily walk to any of the continents, and then teleport
themselves back onshore. The only potential problems are if the Blink spell
malfunctions and crashes - so always save first - and that the party (or
sometimes some of the party) will on occasion get stuck at the
edges of a continental shelf or something, requiring another Blink to bypass
the obstruction.
Anyway, make your way south from Dagger Isle. Go past
Moonglow until you reach the Isle of the Avatar.
(1.1 users: make damn sure you've applied the Blink Patch or the game will go to hell
in a handcart very, very quickly.)

"I want to walk on the sea.. so that I may better find a shore"
-- A Plague of Lighthouse Keepers, VDGG
I suggest you visit the Codex to solve the quests of Compression, Honey and the
Desert shrine, whatever that was. Besides, nothing can quite compare with
the sight of Iolo dressed like Jesus, demolishing the Codex of Ultimate
wisdom with a sledgehammer (just don't save afterwards for goodness' sake)

I killed the Codex of Ultimate Wisdom and all I got was one lousy experience point
Definitely a Dry Blackthorn Day
Now go back into the sea from whence ye came, and wade your way west until you come
to Blackthorn's Island. Beam yourself onto the island, and using two glass
swords, kill both demons. Again, it's a pity, but once banished to the Outer
Darkness you will have two more wonderful spellbooks. Give one to Julia,
and the other to Shamino.
In 1.2, this will not be quite so easy, in that the guards actually do
protect the castle from intruders, unlike in 1.1 where they stand around all day
eating doughnuts or something. Fortunately, I have a cunning plan.
Approach the castle entrance. If you get too close to the guards, one of them
will call out and it will probably all be over. So instead, go up the stairs
and to empty space to the right of the guard, by the right-hand tower.

Assault on Castle Blackthorn
The guard won't care about this, so attack him with a fireball spell and run
back down the stairs. He will follow, probably accompanied by the other guard.
Keep on running until the guard gives up and turns around. Then attack him.
Keep doing this until both guards are dead, then pick through the corpses,
upgrading your stock armour and shields with Oppression models.
If you can, take any spare Oppression chainmail, as we can sell these off at
Britannia for 350 quid each.
Once the first two guards are dead, you have a fairly easy run, since the others
won't try to prevent you entering. However, they will be pretty pissed at what
you've just done, so we aren't out of the woods yet. Probably a good idea to save once
the first stage is successfully accomplished.
So, make our way back to the castle entrance, and you'll find two more guards,
covering for the pair we've just murdered. As you can imagine, they're very angry
and will attack you on sight. But you can do exactly the same trick again.
Now that we've dispatched four guards, we have a shot at the throne room. What I
suggest is that you go into the throne room itself, and the demons, also being pissed
at the killings, will come after you. Lead them out, one by one to the stairs outside
the castle, and get Julia to kill them with a glass sword each.
Grab the money and spellbooks - you now have three fire mages.
Return to Britannia
Now that you've got three fireball-wielding maniacs, it's time to flog all the loot we've
accumulated, so VPR back to East Brittany and sell them to the potion dealer. Stock up
on potions and Food as well.
Once this be done, make your way back to the Great Desert near Minoc.
The Windermere Massacre
And so it was written, that rage would carry him like a howling wind
Leaving only frozen corpses, their bones rattling in hollow armour, to tell their tale in his wake.
-- Arcana Antediluvia, Bal Sagoth
Now it is time to visit the mage academy at Windermere U, which is in the Lake District.
From the northern edge of the Great Desert, where a dragon dwells, jump into the sea and
head directly east, until you come to an icy island with 'beware of the rat' signs. This is it.
You'll need to use Blink or the grapple to teleport yourself up to the
top of the mountain, but once there you'll find an obsidian tower
containing two demons, various skeletons and a few humans.
One of the latter is a young man called 'Pwll', which is prounounced
something like 'Pootle' in Welsh.

Saer'bhan the demon. Quite a nice chap, really.
Our goal is really very simple; we want to rescue Saerbhan the demon and
Arthur the human, and then purge this heathen temple of the mortal scum within.
Lastly and most importantly, we need to take the death-bolt spell from Elistaria's
ravaged corpse as plunder.
That's what we want to do; how this is actually achieved depends on the game version.
First Impression
In 1.1, you really have it easy. Talk to the demons, and promise to find
the skull, buried deep within the vaults. Unfortunately it doesn't exist owing
to a goof by the map designers, but never mind.
Simply waltz past the guards into the castle, and either give Arthur a VPR scroll or an
Ampex VPR-20, depending on which you have to hand.
Then, using your fireball-equipped comrades, slay all the humans and skeletons
in a karma-pummelling orgy of death and pillage. Our only goal will be the western shore!
Second Impression
In 1.2, the skull is in the chests just inside the castle, and not actually
in the vaults at all. To enter, however, you will need to give the guard
skeleton the Word, which we don't know.
Single out this one skeleton guarding the entrance, and kill it in a hail of fireballs.
Then jump back down the mountain and wait a day or so for the others to calm down.
Once it is dead, none of the others will prevent your entry into the castle.
Now you can proceed.
Talk to the demons, and promise to find the skull. Find the servant and
give him a VPR scroll or 1" video recorder as for 1.1.
Now, it's tempting to give Saerbhan his skull back, since he'll then be
happy to help you waste Elistaria, Pootle and everyone else. In practice, the
poor guy ends up being killed, usually by his brother, so it's probably
better to do it ourselves.
WARNING: Saerbhan must only be given his little present when Elistaria is onscreen (or he'll wedge the game).
On account of the fact that 1.2 is even more bloody difficult than 1.1,
I suggest the following strategy; wait until Elistaria goes upstairs to the
crypts in the basement (the castle apparently having been built upside-down)
and then take her out with a glass sword or hail of fireballs.

IOLO:
Once this is done, run away before the other inhabitants have a chance to
avenge her, and wait for things to calm down. Next, go back and take out the
humans and skeletons. It may help if you have already taken Elistaria's spellbook.
Because the demons now actually pay attention to what's going on, they will become upset
if they catch you stealing or murdering the inhabitants. Hence, you will have to climb up
the mountain, commit your crime, jump off the cliff and wait 1 day for everyone to calm
down again. In true Buffy-the-Vampire-Slayer style, no-one ever seems to notice as the
students are brutally murdered one by one.
In either case..
Leave only the demons alive. Find Elistaria's corpse and take her spellbook.
It contains the most fabulous spell (apart from blink) - Death Bolt, also known as
full-track erase head.
Give this appallingly powerful spell to Iolo and put his now-spare fireball
spellbook somewhere.. we'll give it to our next recruit, Sir Geoffrey.
Take all reagents, gems, gold and other goodies and leave the demons to
enjoy their nice new fortress. In 1.2, take the skulls and drop them
somewhere in the throne room where Saerbhan and Fraoch can get at them.
Then leave.
The stop-off at Minoc
When you have got your fill of treasure, either walk or VPR to Minoc. If there's
anything left over that you can't carry, jam it into the chests in the 'vault'
otherwise Saerbhan and Fraoch will have stolen it by the time you return.
At Minoc, go to the Bay Inn, and sell off all the booty. While doing this, I hit upon
a truly beautiful little scam.
In 1.2, the guards will accost you and demand half your money. Making sure all your
followers weapon systems are armed, accidentally bump into one of the guards, and refuse
to give your money. Refuse to come quietly, and seconds later the guard will be quite dead.

"Anyone who stands against the great Champion of Virtue deserves to die, naturally." -- Saer'bhan the demon
Get Julia and the others to strip the body of possessions, then go to the Bay Inn and sell
it all to the Innkeeper, who will happily pay you about a grand for the armour
and weaponry of a guard whom you've blatantly just murdered right outside his shop.

The innkeeper and his ill-gotten hoard
After you have done this the first time, the other guards will panic. Instead of demanding
your money, they will now simply try to kill you, which I guess is understandable.
Also understandable is the fact that the general population don't try to kill you,
since they have evidently had quite enough of their money being taken from them.
It is, as they say, a win-win situation; the guards won't be able to steal people's
money anymore, you'll earn about 4000 gold coins for the effort, the Innkeeper will get
a collection of some serious shiny, and generally everyone will be happy. Except for the guards.

"Leaving only frozen corpses.." -- Bal Sagoth
I believe there are four guards in Minoc, although soon there will be none, and we will have earned
enough money for 40 karma points from the shrine of Sacrifice when that time finally comes.
Once you've converted all your booty into gold, go back into the sea and make your way to
Bucanneer's Den. You can go Northeast from the Trinsic docks, Southwest from the moongate
at Moonglow, or Northwest from Blackthorn's Island.
Once you get there, find and recruit Sir Geoffrey. Give him one of the spare fireball
spellbooks, and then wade southeast to Blackthorn's Island, there to commit a monstrous act of evil.

Assault on Castle Blackthorn
"Crush them, grind them, slay them all!"
-- Beneath the Crimson Vaults of Cydonia, Bal Sagoth
Go into the throne room, and test out Iolo's death ray on Foulwell the jester.
Awesome though the spell is, it has a very slow duty cycle and Iolo will
take up to 10 seconds to reload, so just off the jester and run. When it's
safe, grab the jester's rod and hat. Give these to Geoffrey.. make him
wear the hat always, and he can wield the rod as his 'decorative weapon'
like Iolo's sledgehammer when they aren't in actual combat.
Now, using a combination of fireballs and Iolo's 'blessing' powers,
systematically erase all life from the castle.
Leave only the following: Blackthorn (because he can't die) and the guys
in the dungeon. Oh, and the horses. Everyone else can and must be eliminated
for the good of Britannia. And the experience points.

The Gamma Project in full effect
Once the cleansing is done and you have taught Lord Blackthorn that being
the supreme ruler of Britannia can be quite a lonely job, take the Crown
of Lord British from the roof. Do not wear it - the Blink Patch
can have unpredictable effects and may jam the countermagic effect on,
which would be a disaster given that the party's effectiveness comes from
its spells.
Silvern skull, sable shroud, ebon tower, onyx crown
Witchfire, black citadel, frost-shrouded steel, moon-veiled spell
WITCH-STORM! -- Witch-storm, Bal-Sagoth
When you kill an oppression guard, steal his chainmail and give it to
Shamino, or anyone else who still has crappy armour.
There are two locked areas in Blackthorn's Castle: the NE stairwell, and
the armoury, which is magically locked. The stairwell can be unlocked
with a key obtained from the corpse of the guard captain, but there isn't
much point, since the party members can walk through the walls and into
the stairwell anyway.
Likewise the armoury: don't bother with the door, you can simply reach
into most of the chests through the wall and abstract the contents from them.
You will need a lot of money to buy back the karma this is burning up.
In 1.1, this isn't a problem as the poor bloke in Minoc will sell you
a complete set of karma for about 100 gold coins. In 1.2, we'll have
to rely on the shrines, which are 100 quid per point.

How many corpses can you count, children?
What you must do is take the loot from each guard or minion that you kill,
and stuff it all into a chest. I use the one in the court sorceror's room.
This is important: it must go into a chest. If you just leave the booty
on the ground, Blackthorn will take it, presumably burying it with its owner.
Once every scrap of armour, weaponry and goodies has been crammed into the
chest and there is no-one else left alive apart from Blackthorn and the
other untouchables, fill everyone up with as much stuff from the chest as
they can carry, and swim west to Serpent's Hold.
Here you must sell it all. This will take several trips, but it should
earn you around 12'000 gold coins, which is above and beyond the amount we
need to buy an Avatarhood. While you're at Serpent's Hold, beam aboard
the Oppression ships and get Iolo to do a full-track erase on the crew.

Blessed be the soldiers of the Oppression
If you're still strapped for cash, a highly destructive and treasonable
way of raising money would be to find a merchant who is of no further use
to you, sell him the Crown for 5000 smackers and then get it back by
performing a caeserian section upon him. Unfortunately, this does not
actually work as the crown will not come back out of his body and remains
trapped in some weird limbo-world. It is quite practical, however, to
pawn the crown jewels off, on the assumption that you will be
able to afford to buy them back later.
Note that you cannot unfortunately turn in any of your followers for the
10'000 pound reward, although the suitably depraved can in actual fact
sell the corpses of slain followers to any merchant for a single gold
piece each (or in the case of Iolo, thirty pieces of silver).
This does not affect their later resurrection by the dead king.
Go back to Britain, and stock up on potions and Blink reagents from Cove.
While you're in the area, visit Serpent's Spine (around where you got the
glass swords). On the northern edge there is a settlement of Ettins, who
have an IMC scroll in a chest along with various other goodies.
New New Magincia
Now that you have no karma, it is probably the best time to visit New
Magincia. This is one of the most boring towns in the game. If you like,
you can sort out the pretend Avatar, talk to the kid about humility and fix
the innkeeper's roof. Certainly, you should buy a sledgehammer from the
provisioner, and give this to Iolo as it should be lighter than a warhammer.
Once all possibilities at the town have been exhausted, let everyone loose
upon the unsuspecting populace to increase your supply of loot and
experience points.
Do not kill the sheep; you won't gain any experience for doing this.
Instead, wait until night, when the sheep are in their pen and open the
gate. This has an interesting effect, in that all the sheep will try to escape. Closing the gate is not sufficient to halt this exodus - they will in fact
schlupp through it using osmosis.

"Schlupp.. schlupp, schlupp.."
There is also an evil mega-sheep named 'Snookles' who has 400 health points, but
he will not join your party (nor will you gain any experience for killing him).
Once the island has been returned to its rightful owners, the sheep, it's time to
leave. The government will have to rebuild the island again, this time
calling it "New New Magincia".
You're Dethpicable!
It is almost certain that you have no karma points after the massacres at
Windermere University, Blackthorn's Palace and New Magincia, so make utterly sure you
don't die (save often!).
Use a VPR scroll to return either to Minoc, or one of the shrines you've
previously asked the Codex about. Either way, you can fence off the loot
you've gained from your evil deeds, and convert said cash into karma via
one of the shrines as mentioned above.
Now, once you have at least 80% karma, return to Britain and find the
old wizard dude in the pub. Ask him about the Word and assuming he gives
it to you (you need a lot of karma, he won't give it to bastards), make
your way to Despise.
"Thou, Jubelo, did he tell you the Word?"
The fishlike creature said, "I tormented and vexed his inner spirit, master, but he would not reveal the Word."
"A fanatic," the goat-headed man said. "it is better that he is dead."
--Illuminatus!

"Stop sniggering, Iolo!"
Despise is guarded by orcs and other nasty things. Fortunately you have
Iolo to 'bless' them with his x-ray laser, and three other fireball-wielding
psychos, which makes life slightly easier.
Go down into despise, there to find and recruit Captain Johne and gather
lots of lovely goodies.
Note that in 1.2 the monsters in Despise (a.k.a. 'my first dungeon') can
still easily turn the party into mincemeat in spite of our ill-gotten weaponry.
When dealing with Reapers in particular, I suggest you switch all party members to their
'decorative' modes, get the Avatar to wear the crown (TREASON!!!) and simply hit the trees.
Reapers are exceptionally good at charming your companions, and Iolo running amok with his
Death-Bolt spell is not something you ever want to see happening.
If your idea of the virtue of Compassion involves not killing dragons,
the sleep spell comes in very useful, allowing you to slip past them without
any nasty fighting. But you have to be level 5 to have this.
Once you reach the Core and get the crazy man to join your party, look for
some platemail and the Virtue Staff thing (Avatar's hitting-stick). This stick
is lighter than most swords and is supposedly very potent. And unless I'm much mistaken, they've taken it away in 1.2
Take the Captain's amulet of Turning and give it to Iolo, to prevent future charming. If he
was wearing a spiked gorget, pass this to the Cap'n in exchange. By the way, I find that the
Captain's fedora goes very well with Oppression chainmail.

Sir Geoff, Cap'n Johne, Godfather Smurf, Iolo the Destroyer, Shamino and Julia of Arc
He was a stealer of souls
Once this dungeon has been conquered, stock up on potions, reagents and Food
and make your way back to Minoc. Free the slave child and find her mother
in the poorhouse. She should give you The Word.. use this to enter Covetous.
Go down Covetous, having first cleared up as much room as possible since the
tombs are filled with all kinds of good stuff which we can fence off to the
Food pusher in the tavern. Steal the souls of the five rulers of Minoc, and
do whatever you have to to get the shard 'o hatred. If you get stumped by the
puzzles you can Blink yourself through the walls until you reach the underworld.
Try to retrieve the five souls as you use them; they'll put centuries on Dan's
lifespan. Everyone else can sell them to the innkeeper for a couple of bucks.
When you beat up the liche (again, treason can sometimes prosper) gather up ALL the
chainmail and halberds and stuff these into the fifth king's coffin to prevent it
disappearing upon your return. Note that there are at least three IMC scrolls
throughout Covetous.

"He was a stealer of souls, the Lord of Chaos reaps" -- Hawkwind
Snaffle the shard and then make your way back to the mausoleum. Take as many halberds
and chainmails as you can carry and go back to Minoc, using a VPR scroll as need be.
Sell all the goodies we robbed from the kings' graves to the innkeeper (this will take
at least two journeys) and then go to Empath Abbey where the Flame of Love is kept.
In the Abbey, go to the flame and wait until the keeper arrives. Then summon
wotsisface. This will drive her into an insane rage and she will try to
beat up the Shadowlord. This is foolish as he's immortal at this point, so
don't bother trying to duff him up yourself. Instead, preferably before
he kills the woman, feed his soul into the furnace.
Sadly the people of Empath Abbey don't hold a huge feast to celebrate
your victory, in fact it's quite hard to get them to acknowledge your
contribution at all. This may have something to do with Lord Michael,
of course. Ah well, one down, two to go.
De-seat
This is pretty much self-contained. All you have to do is go to Moonglow
using a VPR scroll, find the gypsy and ask her for the Word (by way of the Great Council conversation tree).
Then, using the power of Blink, go into the sea and walk to Dagger Isle, checking in
with the Shrine in order to formally complete the Honesty quest.
Once this is done, swim to the small island to the east, where the dungeon
entrance is. Go down the dungeon and grab the shard from its pretty
hiding-place amongst the pools of water.
If you're treating dragons as an endangered species, it is, by careful manipulation
of the camera, possible to Blink all the way past them into the outer ring where
the food-stealing gremlins live, thereby avoiding the prospect of Iolo shooting
them down with his death-ray.

Then beam back to Moonglow by VPR and go to the Lycaeum. Since we've
already done the shrine bit, the Flame of Truth should be open to our
request for Faulinei's name. Be careful when talking to the Flame as
it has been known to lock up the engine if you ask it the wrong questions,
so just get the name and tell it to get stuffed.
At this point the Cap'n will say something about saving Faulinei's soul.
Daniel Ti'Fiona is actually going to eat it to increase his magical powers
and lifespan. Everyone else is just going to shove it up the flame of truth.
Why wait.. we have the name and the shard, so let's set light to the little bugger.
Again, there is no fanfare, so make your way back to Dagger Isle. The Shrine of Honesty
has now outlived its usefulness, so have Iolo smash it up with his sledgehammer.
The Hythloth Butchery
The chances are pretty good that the guy who will tell you The Word for
Hythloth is now dead, which poses a bit of a problem. In any case, we can't
ask about him at New Magincia anyway, since it has been purged of all life
bar the sheep.
Since we don't have the Word, we'll have to go do some crimes.
Anyway, go to Hythloth, which is on the Isle of the Avatar. Do this by
going into the sea as usual, but make damn sure you've stocked up on all
the essentials (Food, potions and Blink reagents) before starting out.
At the dungeon entrance, convince the rock to go away. Since you don't have
the Word, get Iolo to kill it either using the sledgehammer or the Erase spell.
When the rock is dead, get the party to sleep for about 12 hours, after which
the corpse of the rock will have been eaten by rats. You can now just
saunter into the dungeon. In fact this should work on all dungeons, if you
are so willing. If the party can't sleep because they've gone neurotic,
leave the area, wait for a few hours and then come back.

"Speak now the mantra of AIIIEEE!!"
If the dead rock won't go away, just keep trying to click past the rock until you
find the right angle to walk through it. It's not that hard.
From hereon you'll just need to go into the dungeon and get the shard.
There's a lot of Blinking involved (in 1.1), hence my note about stocking up.
Don't bother about Uncle Enzo's Quicksword, as it is totally stuck in the
anvil (in 1.1 at least). In fact, if you've found the Quicksword, you've
gone the wrong way.
Once you have the Shard, either VPR out to Trinsic, or work your way back up
the dungeon (getting out through the dead rock is easier than getting
in).
In any case, get ye to Serpent's Hold and make your way into the keep.
Find out the name of the sole surviving Shadowlord and kill his ass too.
And then there were none.

"Let's see.. abandoned ships, containing only Oppression chainmail..
Yep, we've arrived at Serpent's Hold!"
The Sceptre, the Sword and the Ring
The plot now grinds to a total halt. We have no idea what to do anymore,
neither the dead king nor Blackthorn will acknowledge the extermination of the
Shadowlords or hint at what needs to be done next, which makes things hard.
The Sceptre
Never mind, go back to Cove. Around the area of Kafaristan Pass there is a
large tower, Stonegate. Blink your way up to the tower entrance, and you'll
be confronted by a demon who warns you of the terrors within and his dark
master. Neither of these exist.. in fact I'm not sure what he's on about.
Answer his riddle (or not as the case may be).
Although he says he'll kill you, he can't, so just push past him and run up
the stairs to where this nice little stick is being kept. Grab it and leave,
ignoring the demon completely.
The Amulet
The plot is still ground to a halt, but somehow, somewhere I read rumours of
another one of Lord British's trinkets. I think it might be in Destard..
let's go find out. Once again, do the rounds at Cove and Britain to get
yourself sorted out for E's and Wizz.
First, beam yourself to Jhelom using a VPR scroll, and find the mad old man.
You'll need to ask around the pub for The Word beforehand. Once you're done,
VPR back to Trinsic, which is closest to the dungeon.
Go inside.. tell them you are the AVATAR! Uhm, go into the dungeon and
kill lots of orcs. Then find the amulet, which is way down in the swamps
(so make sure your entire party has swamp boots first - you can buy those
from the traitor in Yew).
Shrine Tour
The plot is still ground to a halt, in fact we're completely
winging it now. So what would Brian Eno do? Let's check the Oblique Strategies.
Brian says: "Do nothing for as long as possible.", that's not especially useful,
so let's ask the Codex instead.
But before the Codex will tell us anything sensible, we'll need to sort out the
remaining shrines.
Keep one or two easily accessible shrines intact, such as Compassion and
Spirituality. You can use those to buy more karma as and when you need it.
The rest should be introduced to Iolo's sledgehammer as soon as they have
ordained their quests.
Bet the Codex never predicted this
The only issue this will raise is that the Shrine of Spirituality has been
stricken from the VPR scroll destinations in 1.2. However, if you wait until
midnight, you can use a moongate to reach it.
Once all these are done, it's time to visit the Codex one final time and
learn the Word that will take us into Dungeon Doom, so make sure Iolo brings his hammer. You may save the game this time.

"Now it's time to go sleepy-bye, you worthless piece of garbage!"
"I shall have the Box.. under my hand.. tonight!"
Now that we have the crown jewels, it is time to clean out Lord British's
castle in anticipation of his return. By this I mean the people inside it.
The Revolution has begun, and Chuckles the Jester should be first against
the wall. Have Iolo kill him and put his cap on Shamino.

"It was the time of the Preacher.." -- Willie Nelson (See 'Edge of Darkness')
While you're at the castle, get LB's Sandalwood Box (using Blink to enter the secret chamber).
This is the box which Lord British uses to hide all his pot and coke, which
is why he's so incredibly desperate to get his hands on it ASAP.
In 1.1 you can simply blink into the secret chamber and swipe the thing.
In 1.2, however, Team Lazarus have left us a very nasty surprise:

At first I thought it was gone. But it is there.. you just can't have it.
..so you will have to VPR to Trinsic, get the manuscript for that bloody song
and do the whole harpsichord deal. As a reward for their cooperation, allow
the folk at greyhaven to continue living.
In 1.1, the party should by now be completely psychotic. Make your way to dungeon
Shame (using Iolo to nuke the rock guarding it) and after a long journey, grapple
down the hole at the centre of the lava island. Did I say lava? It's actually
orangeade, which explains why it goes 'splash' and how the party is able to
walk in it without being vapourised.

Willy Wonka's orangeade factory
Don't worry if the path to the hole is blocked by rubble; just reach down
into the hole to the grapple arrow. You don't need to be very near to
these things at all in order to use them. Telekinesis might work too;
but since I've never tried that spell, I don't know.
Now you're inside the dungeon seal. Since you should know the Word from
the Codex, you can either say it, or simply get Iolo to kill it and walk
through. Make your way North and then West to the lava/orangeade bits and
Blink down through the door (having first dispatched all the liches and
other terrible monsters in your path). There's allegedly a switch to
open this door, but I've never found it.
Going down to the final segment of the dungeon, the Blink spell becomes
very useful. You can skip most of the dragons and other nasties by beaming
yourself across the stream, then down to where the demons are and finally
through the wall to where the magic mirror is kept.

Beam to the left point and then down and through the wall
Make your way through the magic mirror, to where the True King of Britannia
is held prisoner. Watch out, he can be very, very dangerous. Run away from
him when you see him and start the conversation from a safe distance.
"WHERE IS THAT BOX OF DELIGHTS?!?"
"I will get that Box from him, rat. For it will give me power. POWER OVER ALL!"
--Abner Brown, The Box of Delights
This really is at its best in 1.1, as by now the entire planet is attempting to
lynch the party for their grim deeds.  This includes the King.
You can simulate this to some degree in 1.2 by having your party members
assault him, and then have the Avatar talk to him while he's distracted
by the task of dismembering the rest of your party one by one.
Firstly, you can 'forget' the Sandalwood Box and arm the entire
party with glass swords. Enter the soulmirror and talk to the King
as mentioned, from a safe distance. Have everyone set to 'ATTACK FREELY'.
When the King finds out that you've forgotten the Box, the words 'THE END'
will fill the screen and it fades to black. In the background you will
hear punching, the sound of five glass swords breaking over the King's
head and ultimately the Avatar's death screams at the hands of his
deranged Liege.

SMASH! "No, Sire! Please! Not the.."
Otherwise, you can do it properly, which is even more strange and terrible.
Talk to the King. He'll get straight to the point and demand the
Sandalwood box full of drugs. As soon as he has it, he will say 'thankyou'
and immediately rewards the Avatar by murdering him on the spot.

"Thou hast outlived thy usefulness, Avatar!"
You will hear the Avatar's scream of agony during the congratulations
sequence and the screen will fade out into a fascinating collage of
images, such as this:
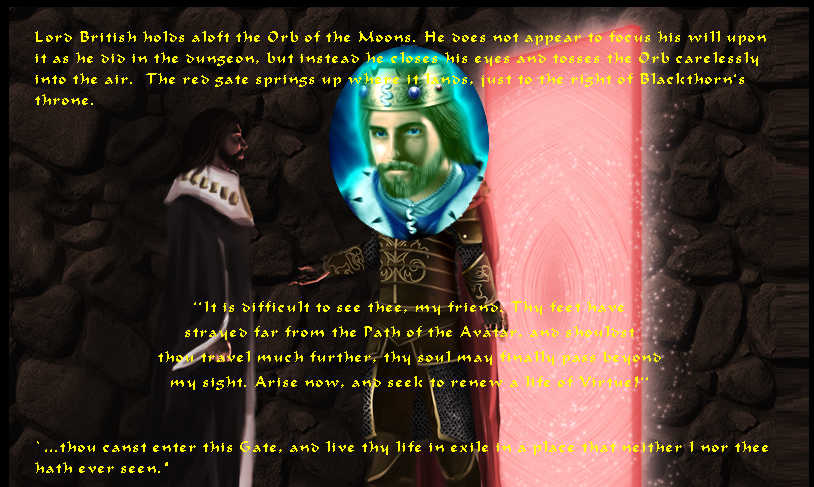 Once all this is done, you will awaken in Lord British's castle, to
embark upon a new reign of terror. (Although they may have fixed that in 1.2)
Once all this is done, you will awaken in Lord British's castle, to
embark upon a new reign of terror. (Although they may have fixed that in 1.2)
"A garland of newborn stars to adorn thee.. the Permian Extinction, a parting gift.
May your maleficent soul walk only in dark places."
-- The Hammer of the Emperor, Bal Sagoth
'Evil Dan' image (C)2005 Eric Harmon, used by kind permission. Thanks, man!
Daniel Ti'Fiona and DMFA created by John and Amber.
Made with some text editors
Back to the front page